
How to Save Chatbot Conversations to a Text File in Python 2026

In this tutorial learn how to store chatGPT Responses automatically into a local text file in a simple steps. Firstly, we need a proper live apikey to communicate with a custom chatbot with python coding. Where actually this helpful in a real – world ai applications.
Whether you are developing a personal AI assitant like a customer support aibot to storing the customers chat history helps to keep you track user interactions, debug responses and improve your system over time.
For an example, in e-commerce platforms like Flipkart or Amazon, chatbots are used to handle customer queries such as order tracking, returns, and refunds. If the chatbot can’t solve the issue, it transfers the conversation to a human support agent for further assistance. Note: If the chatbot can’t solve the issue, it transfers to a human agent.
How openai api store responses locally python
Iam using OpenAI apikey, which is responsible for communicating with the users responses in your chatbot. When a user types a message, the python code send that input to the openai and apikey processes the request using a trained ai model and returns like a human response, which is then displayed to the end user and saved into a file automatically( the file can be pdf, txt, word or database) any thing could be preferrable choice but, here in this tutorial iam using notepad or textfile to store Chatgpt Responses automatically
OpenAI is responsible for generating intelligent responses in your chatbot. When a user types a message, your Python code sends that input to the OpenAI API. The API processes the request using a trained AI model and returns a human-like response, which is then displayed to the user and saved into a file. Lets Jump Into the tutorial code and you may like this tutorial Text to Image AI Generator Using OpenAI API in Python (Step by Step) Visual Studio code
Requirements
- Visual Studio Code
- OpenAI APIKEY
If you dont have the above software Visual Studio Install it and we need a valid openai apikey, so go to openai website and login with your gmail creditenals and create a new apikey.
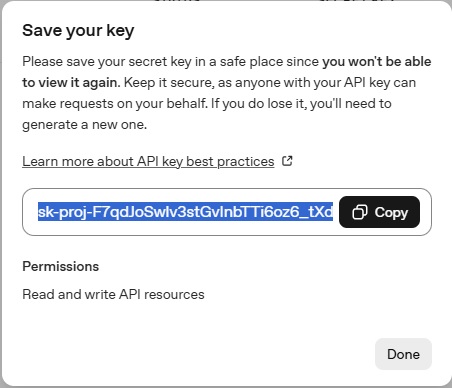
Once you create a secret key , the most important you have to save to apikey in a safe place before submit the done button. If you done without saving your apikey you wont be able to view it again. So, make sure save the secret key in a secure place
Now, Open Visual studio code and create 2 new files ( Savechat_History.py and .env). If you want a full complete video tutorial on youtube Chatgpt Openai API Key Create Chatbot With Save Chat History Prompts In A TXT File
A .env file (environment file) is a simple text file used to store configuration settings and sensitive data for your application. open the .env file and paste the code below and delete my apikey and add your apikey
OPENAI_API_KEY="Your OPENAI APIKEY"
Next open python file which is in my case (Savechat_History.py) and first need to install required packages Run this in your terminal / command prompt:
pip install openai python-dotenv
How To Store ChatGPT Responses Complete Source Code
from openai import OpenAI
from dotenv import load_dotenv
import os
load_dotenv(override=True)
client=OpenAI(api_key=os.getenv("OPENAI_API_KEY"))
def save_to_log(user_text,ai_response):
with open("Save_chat.txt","a",encoding="utf-8") as file:
file.write(f"User :{user_text}\n")
file.write(f"AI:{ai_response}\n")
file.write("-" *30 + "\n")
print("AI Chatbot Started ! (Type 'exit' to stop)")
while True:
user_input=input("You: ")
if user_input.lower()== "exit":
print("(Response Saved To a Save_chat.txt)")
break
response=client.chat.completions.create(model="gpt-4o-mini",messages=[{"role":"user","content":user_input}])
answer=response.choices[0].message.content
print(f"AI: {answer}")
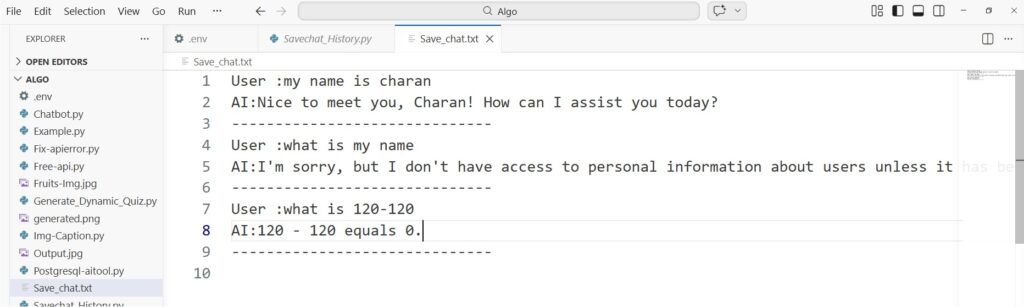
save_to_log(user_input, answer)Final Output Of this Code…
Complete Code Explanation (Short)
- Load API Key: Uses
dotenvto securely load your OpenAI API key. - Initialize Client: Connects Python to the OpenAI API.
- User Input: Takes input from the user in a loop.
- Generate Response: Sends input to OpenAI and gets AI reply.
- Display Output: Prints the chatbot response on screen.
- Save to File: Stores user input and AI response in a text file.
- Loop Control: Runs continuously until user types
exit.
🚨 Common Errors and Fixes
1. API Key Not Found Error
Error: OpenAI authentication failed or API key missing
Fix:
Make sure your .env file contains:
OPENAI_API_KEY=your_api_key_here
Also verify you are using:
os.getenv("OPENAI_API_KEY")2. Module Not Found Error
Error: ModuleNotFoundError: No module named 'openai'
Fix:
Install required libraries:
pip install openai python-dotenv
3. File Not Saving
Error: Chat is not stored in the text file
Fix:
- Check file path
- Ensure
"a"(append mode) is used - Verify function is called:
save_to_log(user_input, answer)
4. Encoding Issues
Error: Special characters not saved properly
Fix:
Use UTF-8 encoding:
open("Save_chat.txt", "a", encoding="utf-8")AI Engineering Mock Interview Questions and Answers
1. Explain your chatbot project.
Answer:
I built a chatbot using the OpenAI API in Python. The chatbot takes user input, sends it to the API, and displays the AI-generated response. I also implemented a feature to save conversations into a text file, which helps in tracking user interactions and debugging. This project demonstrates API integration, file handling, and basic chatbot design.
2. How do you handle conversation memory?
Answer:
I store previous messages in a list and send them with each API request. This allows the chatbot to understand context and respond more accurately. For long conversations, I limit the history to reduce token usage.
3. What challenges did you face while building the chatbot?
Answer:
One challenge was handling API responses and ensuring the chatbot didn’t return empty or incorrect outputs. I resolved this by validating responses and improving prompt structure. Another challenge was saving data correctly, which I solved using file handling in append mode.
4. How do you optimize API usage and cost?
Answer:
I reduce token usage by limiting conversation history and using concise prompts. I also set max token limits and avoid unnecessary API calls, which helps control cost and improve performance.